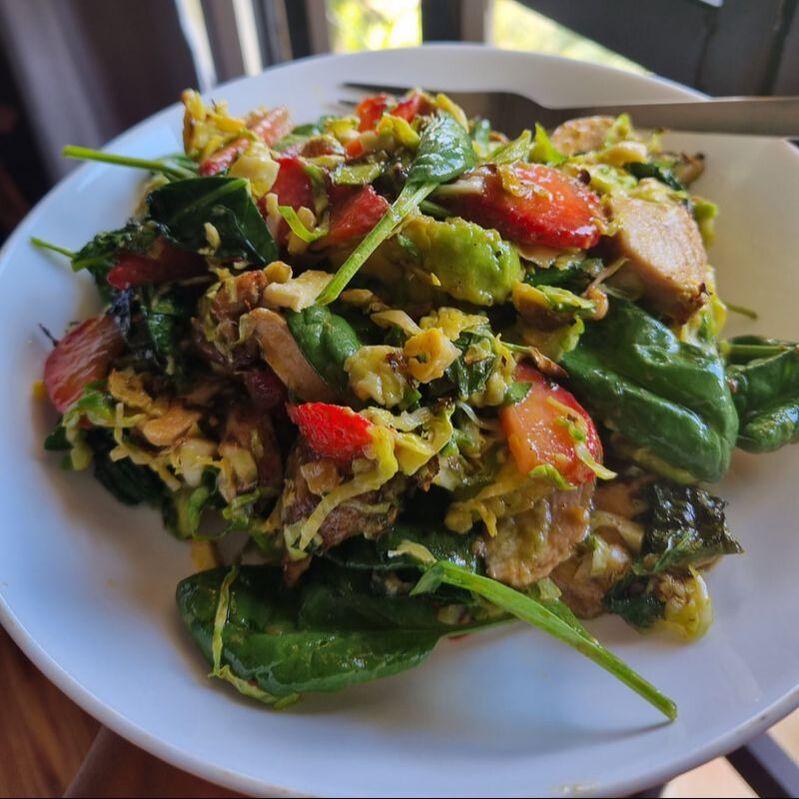
 Mainly called the Ruby Chicken Salad due to the use of either strawberries or pomegranates in this recipe. Made once, was blown away, made a few more times a delight each time. There’s the slightly cooked greens, the absolutely raw greens, the crunch from the almond, the substantial chicken pieces and the bright notes of fruit all in one. The balsamic dressing goes perfectly with the fruit. I absolutely loathe boring salads and have a strange disdain for large leaves of salad in my bowl. You’ll find neither in this one. What You Need: Kale (any kind you like), thinly sliced Brussel Sprouts, thinly sliced Baby Spinach Shallot, peeled and thinly sliced into half moons Strawberries (sliced) or pomegranates Chicken breast Any choice of dried mixed herbs/ras al hanout Some grated parmesan Almond slivers, toasted The dressing: Chopped garlic Dijon mustard Balsamic vinegar Salt Extra virgin olive oil *how much of these things to do you need? Oh man, I don’t know. It’s a salad. Free and easy I guess. Like kale? Use more kale. Want a lot of chicken? Use more chicken. As for the dressing, taste and adjust as you go. What You Do: 1. First, preheat the oven at 180degC. Turn up the heat of your pan/griller too. 2. Slather the chicken breast with your choice of herbs and salt. Any type will do, although I prefer either rosemary or ras el hanout for stronger flavour. When pan/griller is hot, start grilling the chicken. Only for a few minutes until chicken is cooked through (no dry breasts please). Remove, and let cool before you chop into rough bite-sized pieces. 3. Place the kale and brussel sprouts as a layer in your baking tray, and into the over for about 10 minutes. You want them to be slightly cooked down, with slight brown edges. Don’t burn them. 4. Place the kale and brussel sprouts in a large mixing bowl, together with the shallots, spinach, strawberries/pomegranate. In the picture, I was using strawberries. 5. Add a two tablespoons of the dressing and toss well. Then add the chicken pieces and grated parmesan, one more tablespoon of the dressing and toss again. The secret to good salads is the tossing time. Spend at least a minute doing this. 6. Tumble everything on a large plate, and sprinkle over the toasted almonds. Serve as a big sharing platter, or it always tastes good as a TV dinner. 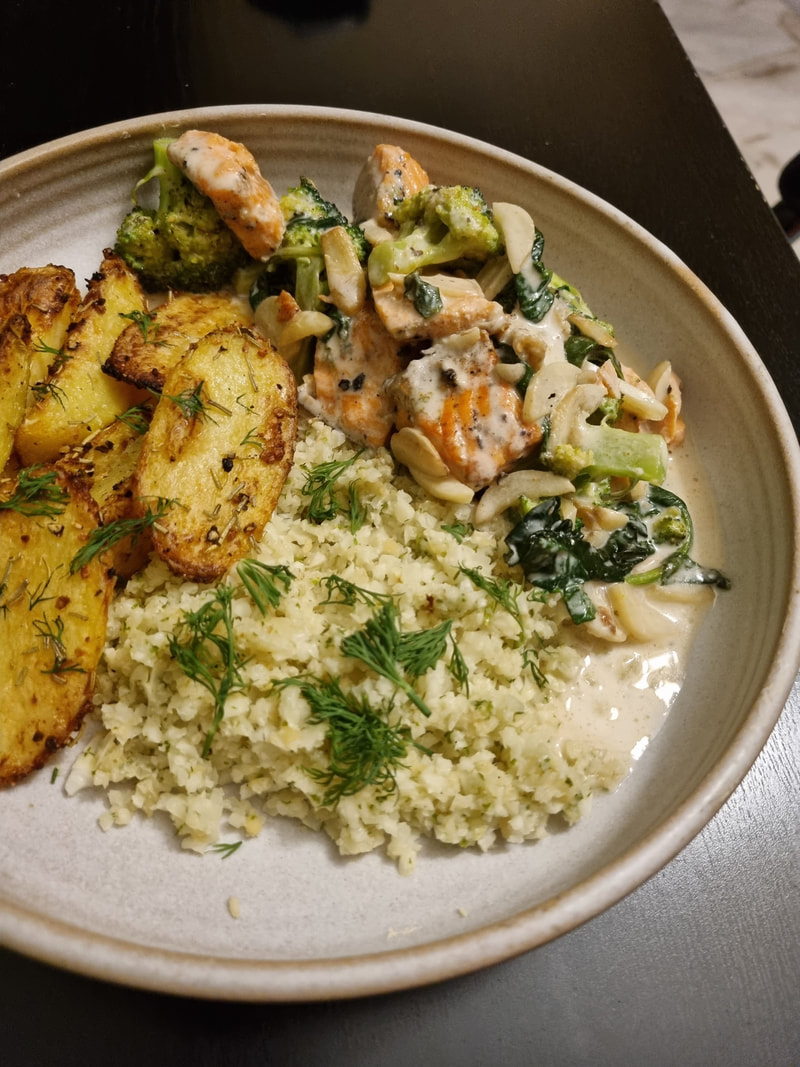 Tender chunks of salmon in garlicky, creamy coconut sauce infused with coriander.
There are so many great ways to make salmon, and this is definitely one of the top in my books. Simple, and goes well with a side of rice, cauliflower rice, or even some mashed potatoes. You can use either salmon or trout for this, their flaky pink flesh wonderfully contrasting the pale green, fragrant sauce. What You Need: 1 fillet salmon, de-boned and cleaned 4 cloves of garlic, peeled and sliced 1 large red chili, sliced at an angle 1 cup coconut milk 1 large handful coriander Juice of 2 large limes Broccoli florets (optional) What You Do: 1. In a blender, blitz the coconut milk with coriander until you get a beautiful, green-hued liquid. 2. In a non-stick pot, heat two tablespoons of olive oil. 3. Cut the salmon into bite sized chunks. Into the hot pot. Cook for 2 minutes (it's okay if it's undercooked at this stage). Remove salmon. 4. In the same pot, add the sliced garlic and chili. Sautee until fragrant. If using broccoli, add them now. Stir. 5. Add the coconut milk. If it's too thick, add some water. You want a slightly runny sauce. Season with salt and pepper. 6. Add salmon, and let simmer away for a few minutes on a very low heat. 7. Turn off the heat. Add the lime juice little by little. Taste as you go along. You're looking for a tangy, creamy sauce. 8. Serve warm, over a bed of rice, or cauliflower rice, or even with some potatoes. 9. Great. Now even I'm craving some. 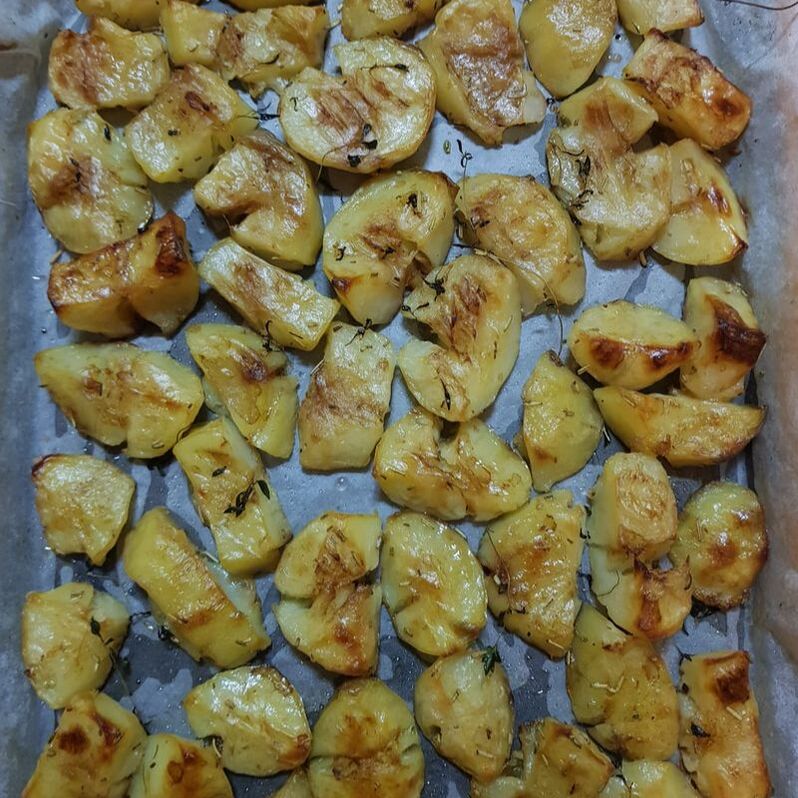 I kind of feel that if you say you don't like roast potatoes, that's probably because you've never had really good ones.
Good ones = crispy exterior, fluffy insides, VERY well seasoned. I'm a sucker for roast potatoes, so naturally I've tried just about every roast potato recipe out there. Eventually I landed on this one, a recipe that's simple, and has a slight tanginess to the potatoes thanks to the vinegar used in the dressing. I love the vinegar in the recipe because it makes the roast spuds not boring. For the potatoes, I reckon just about any yellow-skinned potato you can find in Malaysia will do the trick. You can also opt to keep the skin on, although I find that peeling the potatoes guarantees a crispy exterior. What You Need: 500 grams potatoes, or frankly, anywhere between that and 1 kilo would do 5 cloves of garlic, skin on 2 small knobs of butter (if going vegan, sub this with 2 tbsp olive oil) 1 tsp dried/fresh rosemary 2 tbsp balsamic vinegar, or white vinegar Olive oil What You Do: 1. Preheat your oven at 180 degrees C. 2. Peel the potatoes, and if they're big, cut them into the sizes of golf balls. 3. Boil them in a pot of water (make sure they are submerged!), plus 1 tsp salt, for about 15 mins, or until the potatoes can be pierced with a fork (in other words: parboil them). 4. Drain the potatoes, leave them for about 2 mins. Toss them around in the colander, so that the outsides kind of break a little. Don't worry if some of the potatoes break off in pieces, it's all good! 5. Transfer them into a large bowl, and toss them with the butter, a pinch of salt, and a tbsp of olive oil. Make sure they are well coated, and transfer to a baking tin. Into the oven for about 30 mins. 6. Meanwhile, get the dressing ready. Mix the vinegar, rosemary, 2 tbsp olive oil, garlic, pinch of salt, pinch of pepper together. 7. After 30mins, take the potatoes out. Using a flat-bottomed drinking glass/cup, press onto each potato until they are cracked or smashed slightly. (why do we do this? It's so that the potatoes and get crispier, and the dressing can get into them!). 8. Drizzle your dressing all over the potatoes. Scatter around the unpeeled garlic cloves. Into the oven for another 25 mins, or until they are crispy and slightly dark around the edges (yum yum yum). 9. I love to either eat them just like that with ketchup (terrible, I know), or they go great as a side to any kind of meat/chicken roast. Sometimes I even mix them up with some beautifully roasted vegetables for a lovely meat-free meal.
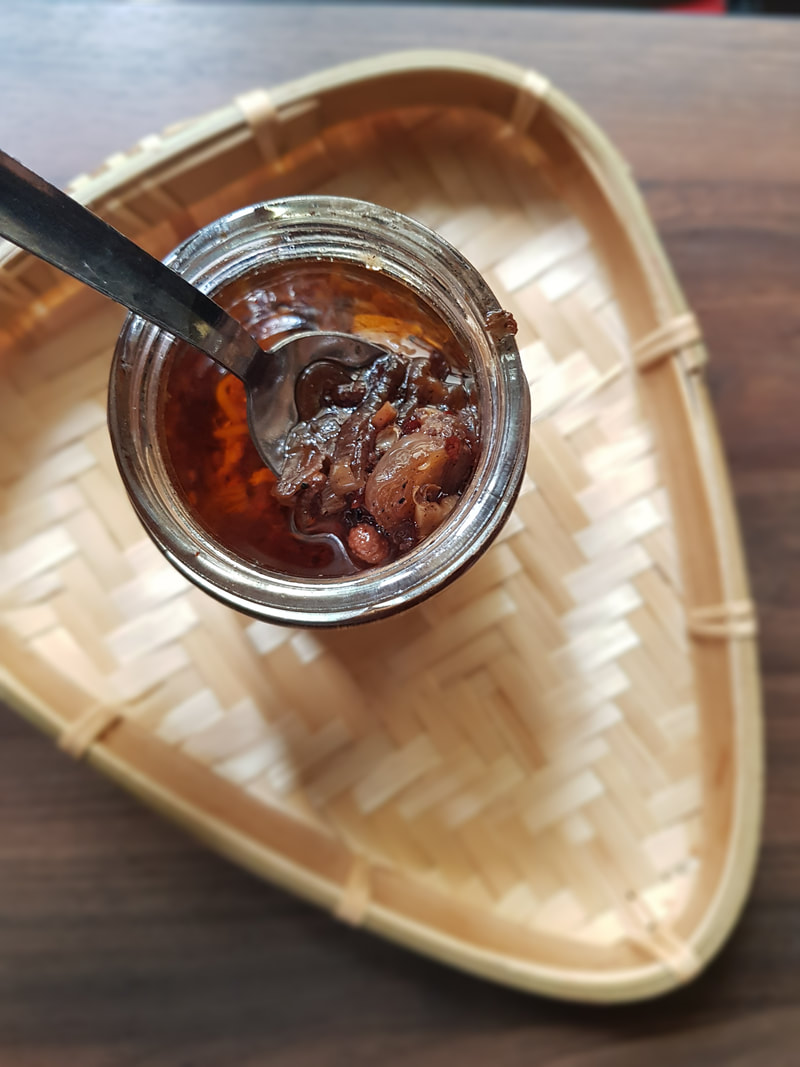
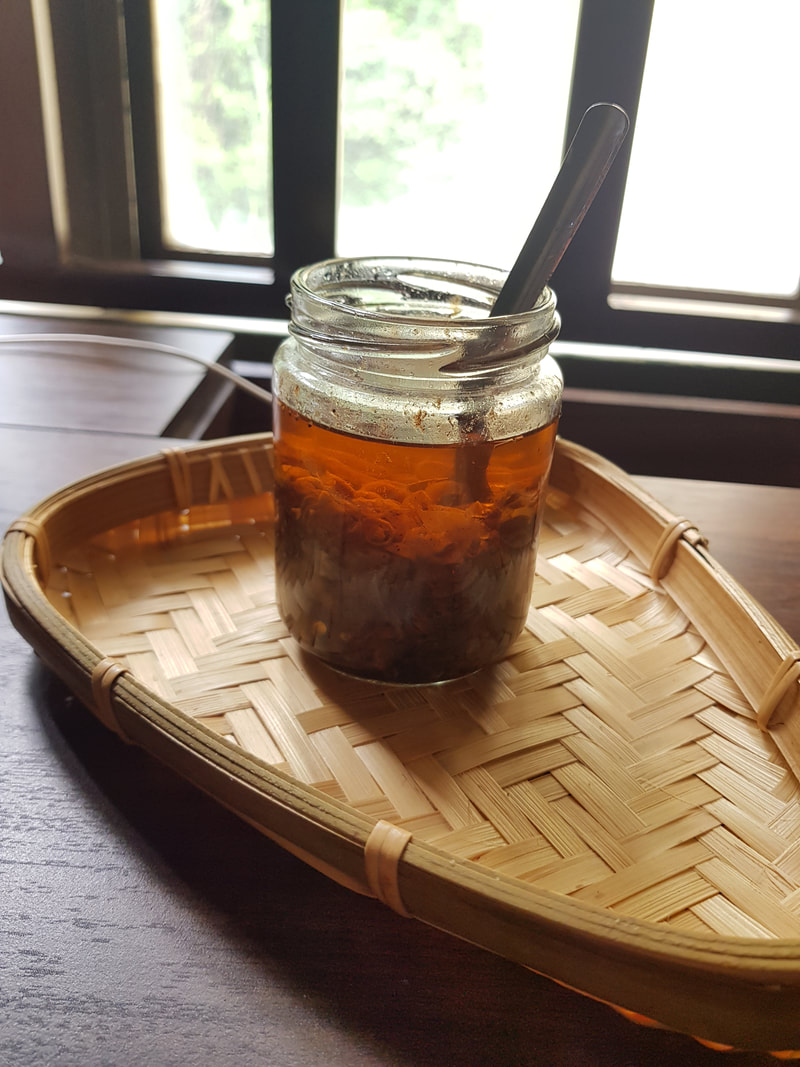
The f are sichuan peppercorns? Well I'm glad you asked.
They are peppers exclusively grown in the Sichuan province of China, and they gained their fame through their trademark heat and tongue-tingling feel. These days they are sold almost everywhere in grocery stores in the city, and you can even buy them online. There are about a million different recipes for chili oil out there, and this one uses the sichuan peppers as an ingredient. This chili oil uses ginger and a lot of shallots for depth in flavor, and the key to finding the perfect chili oil recipe for you is to - ADJUST THE INGREDIENTS according to your tastes. So if you like it to be head-blowing hot, add an extra tablespoon of chili flakes and sichuan peppers, or two. You like ginger? Add an extra thumb-sized root in there! This recipe serves as the base of the chili oil of your dreams, for your toasts, congee, soups and even eggs. What You Need: 2 tablespoons Shizuan peppercorns, roughly grinded with a pestle and mortar 10 shallots, peeled and sliced thinly 3 cloves garlic, peeled and sliced thinly 1 thumb-sized ginger, peeled and sliced thinly 1 tbsp chili flakes 1 cup neutral oil (I use regular vegetable oil) 1 tbsp sesame oil 2 tbsp light soy sauce 1 cinnamon stick 3 cloves What You Do: 1. In a large wok, or pot, heat your neutral oil with the cinnamon stick and cloves. Ensure that the fire is low and slow, always. 2. As the oil heats up, add your sliced shallots and ginger. Cook slowly, until the shallots have become softened and translucent. 3. Add the sliced garlic, chili flakes and shizuan peppercorns. Continue cooking for about 5 more minutes. NOTICE: If at any point it looks like things are burning (because some woks are jerks), just turn the heat off and allow the wok's temperature to cool down. 4. Turn off the heat, and add the sesame oil and soy sauce. Remove the wok from the stove, and just let it sit there for an hour or so, or until it has cooled down. Do NOT attempt to meddle with it while the oil is extremely hot! 5. Taste, and see if you need any salt or perhaps an additional dash of soy. If it's already perfect, transfer your chili oil into a jar and keep refrigerated for future use. Remove the cinnamon stick. Chili oil always taste better the next day, as you would give it more time to infuse. 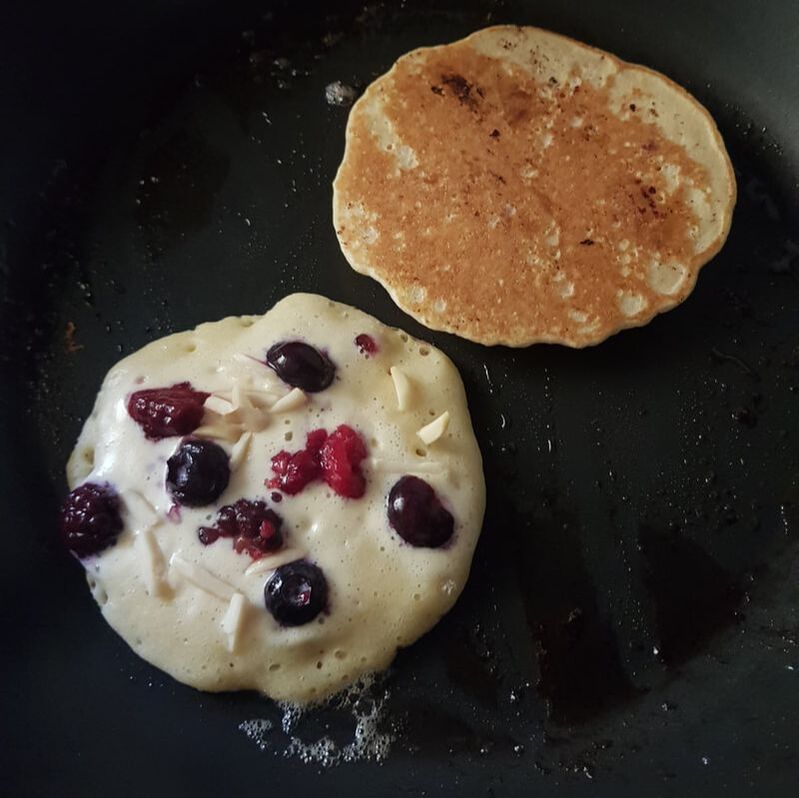 Pancakes are great, but have you ever tried lemon pancakes, with berries and almonds in them? It's an elevation, from a regular treat to a decadence! The grated lemon zest gives off a citrusy fragrance to the batter that is perfect to wake you up, and berries as well as almonds add antioxidants and protein, not to mention making your Pancake Day a lot more interesting.
This recipe calls for buttermilk, but in case you don't have or can't find buttermilk, here is how to compensate: use the same amount of regular milk, add a tablespoon of lemon juice and let sit for 5-10 minutes. This will give you the tanginess you'd get if you use buttermilk. Another note to perfect pancakes is this: DO NOT OVERMIX THE BATTER. This is how you end up having no volume or fluffiness in your pancakes. What You Need: 1 1/4 cups all purpose flour 1 tsp bicarbonate soda 1 tsp baking powder 1/2 tsp salt 1 egg 1 1/4 cups buttermilk 2-3 tbsp melted butter 1 tbsp sugar 1/2 tsp grated lemon zest (OR, 1 drop food-grade lemon essential oil) 3/4 cup frozen berries 1 handful sliced almonds What You Do: 1. Sift the flour, bicarbonate soda and baking powder and salt together. 2. Beat the egg with a whisk until it’s pale yellow. Add the buttermilk and whisk again. Add in the grated lemon zest (or food-grade lemon essential oil). 3. Add the sifted flour and mix. Do not overmix, a few lumps are fine. This is what gets the pancakes fluffy. 4. Add the melted butter and sugar to combine. 5. Heat a non-stick griddle to medium heat. Add a ladle of the pancake mix. Top with berries and almonds. Turn when bubbles begin to form on the surface. 6. Eat immediately, even better with some maple syrup. 7. You can keep the batter in the fridge for another day, it will last for about a week.  Pumpkin soup is easy to make, easy to eat, but can also easily feel like pureed baby food.
Enter the crispy sage and chili oil. This recipe makes the most out of the pumpkin, by roasting them until they are browned, and this will introduce a different, deeper flavour to the vegetable. For the chili oil, you can easily use store-bought chili oil, but if your wish to make your own, you can get the recipe of my version of chili oil HERE. What You Need: Half a medium sized pumpkin, peeled, and cut into big cubes 5 cloves of garlic, skin on 1/2 tsp rosemary, dried or fresh 1 bunch of sage, leaves only 1 cup of vegetable stock, or vegetable stock cube Extra virgin olive oil Optional: Chili oil What You Do: 1. Preheat the oven at 180 degrees C. You can also use your air-fryer. 2. Toss the pumpkin cubes and garlic in some salt, extra virgin olive oil and rosemary. Arrange on tray, pop into the oven or air-fryer, and roast for between 30-40 minutes, or until the pumpkin is soft and beautifully sweet. 3. Remove the pumpkin into a blender, take the skin off the garlic and add them to the blender as well, then add 1/2 cup of your stock or your stock cube with 1/2 cup of water. Blitz until smooth. 4. In a deep, non stick pot, heat 2 tbsp of extra virgin olive oil, and add the sage leaves. You want to fry them up for 1 minute or until the leaves are crispy. Remove the leaves onto a plate. 5. In the pot, with the remaining oil, add the pumpkin blend you've made. Add the rest of the stock or another 1/2 cup of water, and bring to simmer. If the soup looks too thick for you, you can always add more water, according to your preferred consistency. 6. Ladle the soup into a bowl, scatter some sage leaves on top and drizzle some chili oil around. Eat steaming hot.  Crispy, oven-baked/air-fried broccoli slathered in a gingery, garlicky sour and slight spicy sauce. Great as a snack, also amazing as a side to simple fried rice or noodles. You can opt to use cauliflower instead of broccoli, although I personally prefer the charred taste of broccoli in this recipe.
When making the batter, don't be too concerned about how thick/thin it should be. All you have to make sure is that it has enough consistency to stick to your broccoli florets, as this is what would ensure the crispy texture. When making the sauce, taste, taste, taste! Some people prefer the sauce hotter, others prefer sour, so adjust according to your own personal preferences. What You Need: 1 whole head of broccoli 3 tbsp flour 2 tbsp corn flour 1/2 tsp Paprika 1 tbsp light soy 1 tbsp dark soy 2 tbsp tomato paste 1 tsp chili powder 1 clove garlic, grated 1-inch ginger, grated Sesame seeds What You Do: 1. If using an oven, preheat it to 180 deg C. 2. Cut the broccoli head into medium-sized florets. Peel the stalk and chop it into dime-sized pieces. 3. Next, lets make the batter. Mix the flour, corn flour, paprika and a dash of salt. Add 2 tbsp water first. Mix the batter, and if it's too thick you can add more water accordingly. Ideally, you're looking for a pancake-like batter. 4. Add the broccoli into the batter, and mix well to ensure the florets are well coated. Transfer them ontp a lined baking tin, and pop into oven or air-fryer for around 15-20 mins, or until crispy. (for air-fryer, turn it up to 180 deg C) 5. Meanwhile, make the sauce. Mix the soy sauces, tomato paste, chili powder, garlic and ginger. When the broccoli is done, take them out of the oven and into your bowl of sauce. Mix everything thoroughly. 6. Put the broccoli back onto the tray, sprinkle the sesame seeds all over the florets, and cook further for 5 mins. 7. Take them out, eat while hot with your favorite fried rice or noodles. If eating as a snack, enjoy as is or with some hummus. 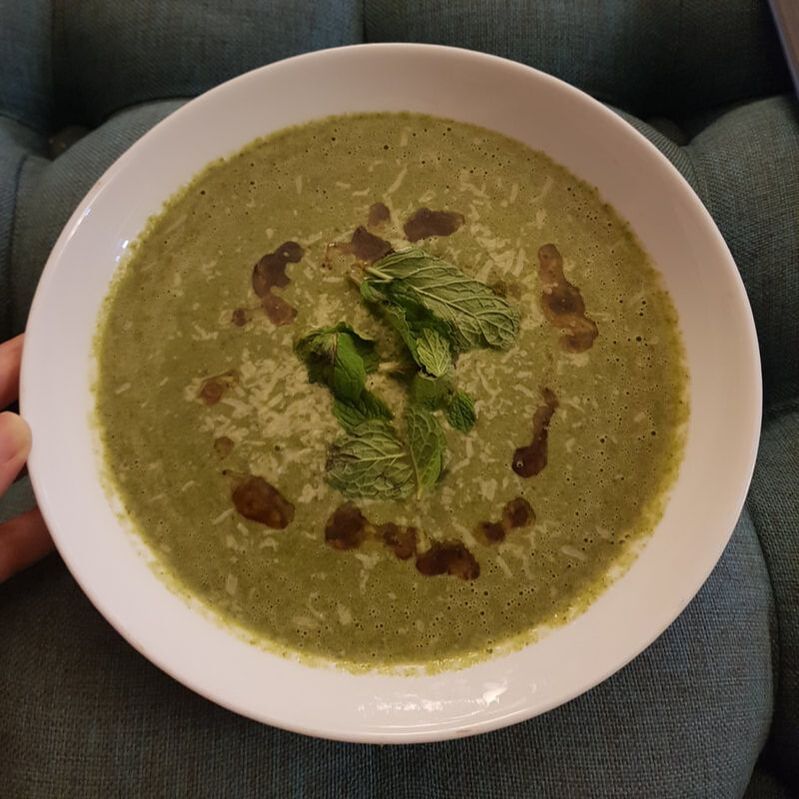 It's an extremely green soup made of extremely green things. But before you think 'Eww, so smushed up grass?', it really isn't. It's a concoction of beautiful greens of very different natures and tastes - nutty peas, earthy broccoli, sweet spinach and fragrant mint. I love this especially when I'm feeling under the weather, as I know I am getting all the nutrients I need from this bowl of goodness.
This soup is also perfect for batch cooking, and for freezing. This recipe serves 2 portions. What You Need: extra virgin olive oil 1 white onion, chopped 2 cloves garlic, chopped 1/2 tsp chili flakes 200gm frozen green peas (NOT canned) 2 handfuls broccoli, cut into rough pieces 1 cube vegetable stock, or 1 cup 3 large handfuls spinach 1 large handful fresh mint Grated parmesan Optional: Chili oil for garnish What You Do: 1. In a pot, heat 2-3 tablespoons of extra virgin olive oil, and sautee the chopped onion until they've turned transluscent. Add the chopped garlic and chili flakes, and continue stirring for 2 mins. 2. Add the frozen peas and broccoli, stir everything to cook through for about 5 minutes. 3. Add vegetable stock/cube, and add an additional cup of water. If using cube, add 2cups of water. Let simmer. 4. Once it has started to simmer, add your spinach and 2/3 of your mint, and cook for another 2-3 minutes until the spinach has wilted. Season for taste, then turn off the heat and let cool. 5. When you're ready to eat, simply blend this mix, and heat again if necessary. 6. Ladle soup into a bowl, and garnish with the rest of the mint leaves, and some grated parmesan. If you're feeling extra, drizzle over some chili oil for that extra kick. 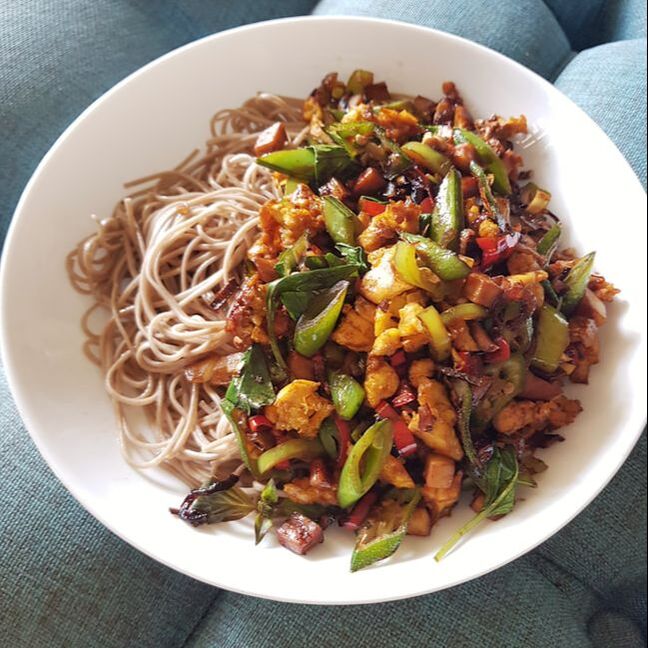 This recipe is a wonderful celebration of fresh fragrant Asian herbs. Crispy tofu in a fragrant lemongrass stir-fry, made more abundant with meaty mushrooms, sugarsnap peas and some soba noodles to carry all those flavours through.
This one makes 2 servings. What You Need: 2 Firm tofus 2 large handfuls Mushrooms, chopped (shitake or king oyster) 1 large handful Sugarsnap peas, sliced into halves 1 Red Onion, thinly sliced 1 Red Chili, sliced 2 stalks Lemongrass, thinly sliced 1 handful Thai Basil 1 tbsp vegan oyster sauce 2 tbsp light soy 1 tbsp thick soy 1 tsp tumeric powder Sesame and cooking oil Soba noodles What You Do: 1. First, the crispy tofu. To do this, crumble them in a bowl to resemble coarse minced meat. Sprinkle some tumeric powder. Cook in air-fryer/oven, 180 degrees for 20 mins, or until golden and crispy. 2. Meanwhile, boil some water and pop in the soba noodles. They take literally 2 mins to cook. Drain. Toss in some sesame oil. Plate. 3. In a large pan, heat 1 tbsp cooking oil and add the chopped mushrooms. Cook until they are slightly browned and softened. Remove from pan. 4. Add 1 tbsp oil, and add onion, chili, lemongrass. Cook until fragrant, and onion is transluscent. 5. Add sugarsnap peas and the cooked mushrooms. Add the crispy tofu. Stir for a minute, then add the vegan oyster, light soy and thick soy sauces. 6. If it looks a little dry, add a splash of water. But remember this is a stir fry, not soup. Add the thai basil leaves in the final minute. 7. Pour this heavenly fragrant mix onto your soba noodles. 8. Best enjoyed while watching The Kardashians (especially the episode where they are all eating salads. which is basically every episode.)  Baked eggs are things that sound fancy, when in fact, they are absolutely not and it is hard to screw them up. If you're somebody who enjoy half-boiled eggs, you'll definitely enjoy these herby baked eggs, which allow you to also dunk and soak toast in them, with the added bonus of buttery taste and the fresh herby addition to the entire dish.
You can use either an air fryer or an oven for the job, and fresh herbs are definitely recommended, although dried are not so bad either. This recipe makes 2 small ramekins/baking dishes of baked eggs. What You Need: 6 eggs 2 tbsp butter 8 tbsp of fresh milk Herbs - all or anything between chopped coriander, parsley, rosemary and/or thyme 2 cloves garlic, chopped 2 tbsp grated parmesan Salt, pepper What You Do: 1. Heat the oven at 200-220 degrees (very hot!) 2. In 2 small ramekins or baking dishes, place the milk and butter equally in each (each ramekin: 1 tbsp butter, 4 tbsp milk) 3. Place the ramekins in the oven or air fryer, heat until the butter melts and the milk bubbles. 4. Take the ramekins out, crack 3 eggs in each ramekin, top with a sprinkle of salt, chopped garlic, chopped herbs, black pepper and parmesan. 5. Place the ramekin back into the oven, for about 8 mins, or until the eggs whites are a set but the yolks still runny. 6. Eat with some crusty toasts to dunk into. |