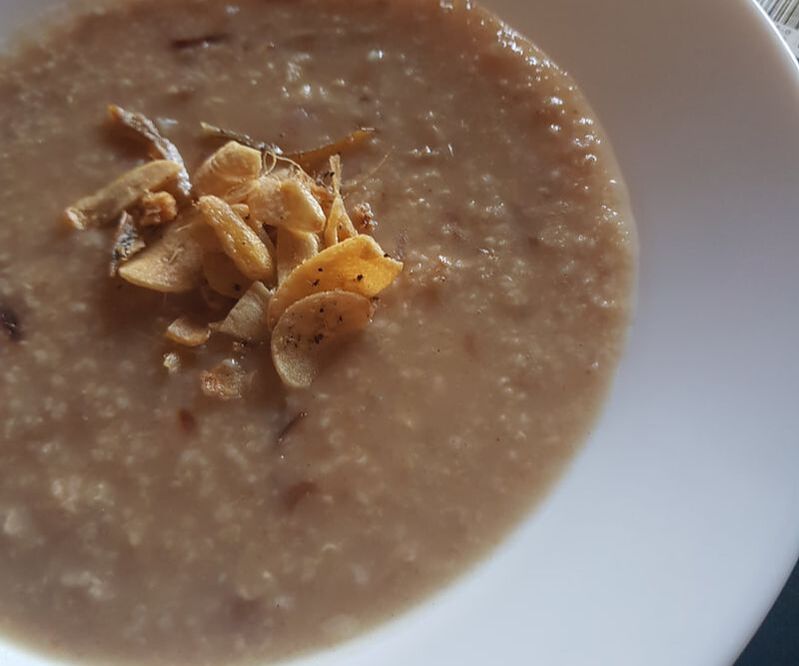
 I know, it sounds crazy and borderline gross. But you have to trust me. The idea of savory oats was first introduced to me by my beautiful friend Aisyah. For the 3 decades of my life, I had always thought that the only way to have oats would be the sweet kind, with a mix of some type of milk, and perhaps some fruit involved. And honestly, because I prefer savory breakfasts, I didn't often eat oats because of this reason. Now, enter this recipe for a warm bowl or savory and slightly spicy oats, and I find myself wanting to have it again and again. It tastes like your usual congee, but of course, it's much much healthier, with enough fiber and goodness to keep you full until lunch. The recipe uses Malaysian soup seasoning (Perencah Sup Adabi paste, to be exact), but feel free to swap them with some ready-to-go stock or other soup seasoning substitutes. This recipe makes 2 servings. What You Need: 1 cup ready-to-eat oats (I use Quaker Oats!) 1 clove garlic, minced 1 large shallot, chopped 1 teaspoon soup seasoning (or your choice of substitute) Optional: Crunchy fried garlic for added texture What You Do: 1. Heat 1 tbsp olive oil in a small pot. Add garlic and shallots. 2. When the garlic and shallots start to get translucent and fragrant, add the seasoning. 3. Add the oats and 1 cup of water. Bring to boil. 4. If it looks too thick, add a little splash of water. 5. Remove from heat, garnish with the crispy garlic and some cracked black pepper. 6. Great with a side glass of refreshing fresh juice. 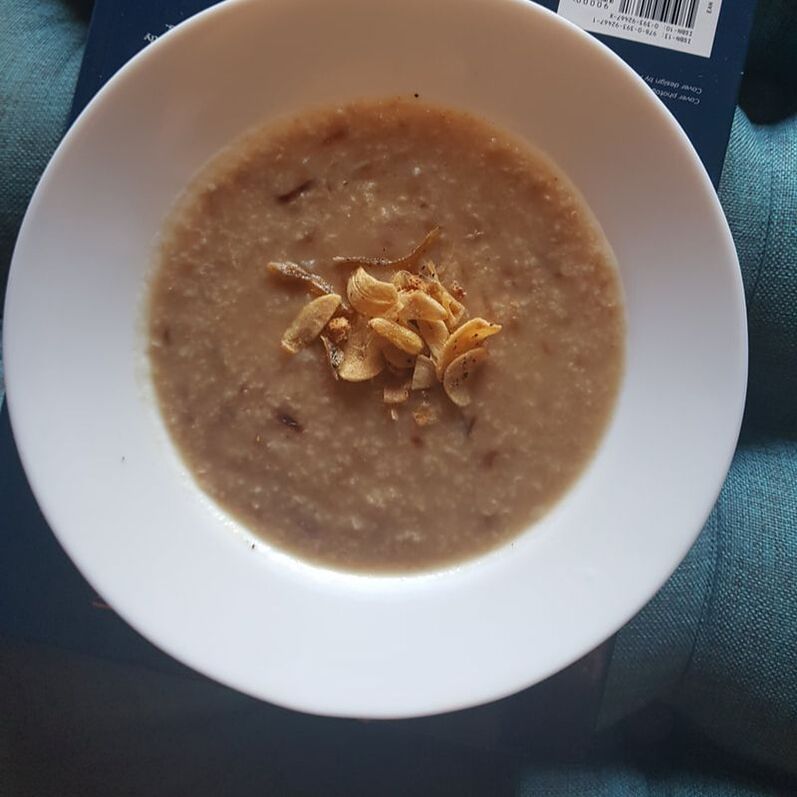  You'll need a whisk, and a bowl. A measuring cup is preferred, but if you don't have any, guesstimation is fine. This is the master recipe for basic, fluffy pancakes, like the ones in IHOP. God, IHOP. I love that place. Once you’ve mastered this basic recipe, feel free to add your own layer of imagination. Throw a handful of berries, maybe? How about some chopped nuts? A douse of maple syrup and some butter is amazing enough, but you can always grill some bananas in a pan with some butter and sugar to go with the pancakes to take it up a notch. What You Need: 1 1/4 cups all purpose flour 1 tsp bicarbonate soda 1 tsp baking powder 1/2 tsp salt 1 egg 1 1/4 cups buttermilk 2-3 tbsp melted butter 2 tbsp sugar What You Do: 1. Sift the flour, bicarbonate soda and baking powder and salt together. 2. Beat the egg with a whisk until it’s pale yellow. Add the buttermilk and whisk again. 3. Add the sifted flour and mix. Do not overmix, a few lumps are fine. This is what gets the pancakes fluffy. 4. Add the melted butter and sugar to combine. 5. Heat a non-stick griddle. Add a ladle of the pancake mix. Turn when bubbles begin to form on the surface. 6. Eat immediately. 7. You can keep the batter in the fridge for another day, it will last for about a week. 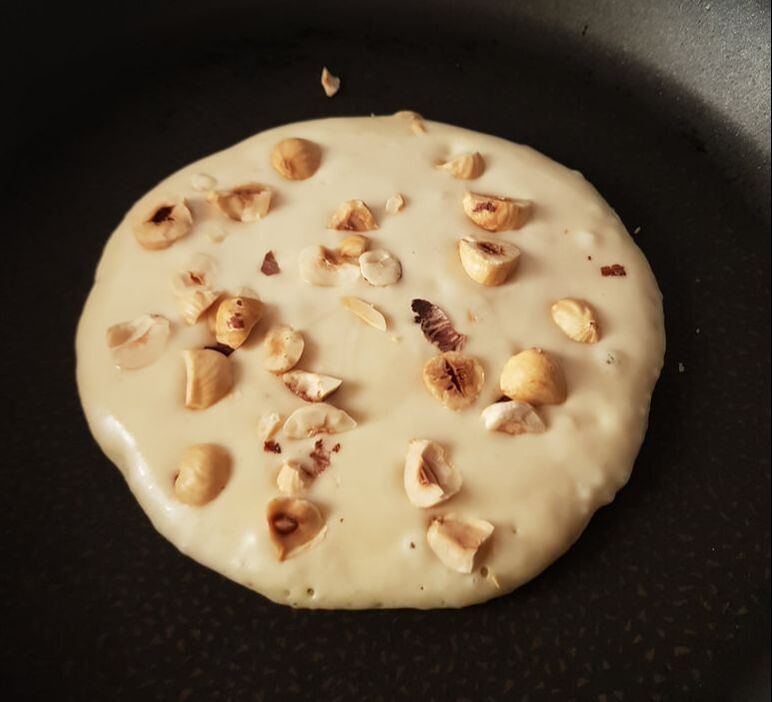 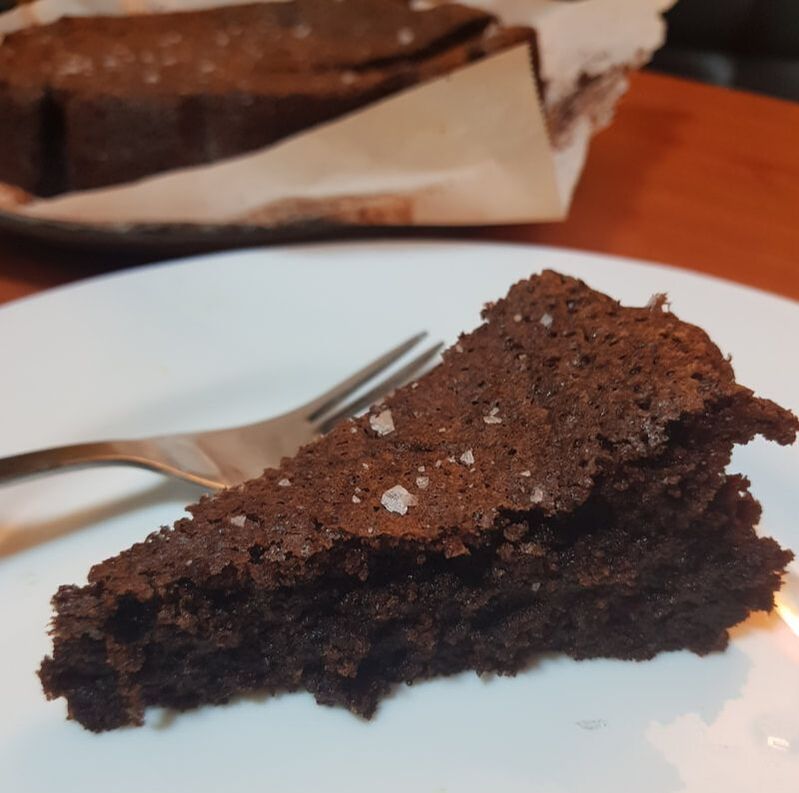 The first time I had this was in Amalfi, Italy. It doesn't get anymore movie-like, guys. I was sitting outside at a cafe by one of the small streets of that Italian town, the waiter was singing along to some Italian song playing softly on the radio, and the small plate with a slice of the most delicious, decadent chocolate almond torte was right in front of me. There's just something about the use of almond flour instead of regular flour that brings the dessert a nutty, fragrant quality to it. There's no oil or butter in the mix, which makes the whole thing taste light, and yet the dark chocolate, enhanced with some salt, makes it feel really luxurious. Anyway, if I have any regret in life, it is that I didn't order a second plate of this at the cafe. This version I'm sharing comes close to the real thing - until next time I'm back in Amalfi, that is. What You Need: 6 eggs 3/4 cup caster sugar 2 cups almond flour 1/2 cup 100% cocoa powder 1 tsp salt 1 tsp baking powder 1/2 tsp baking soda Optional - sea salt flakes to garnish (I use Maldon sea salt flakes) What You Do: 1. Preheat oven at 180 degrees Celsius. Take the mixer out for some action. 2. On medium speed, mix the eggs and sugar until it's a pale-colored mix. 3. Add the almond flour, cocoa powder, salt, baking powder and baking soda until smooth. 4. Pour batter into a round baking tin lined with baking paper, and greased with a little olive oil. 5. Bake for 45 minutes to 1 hour, depending on your oven. The cake is done when you insert a toothpick and it comes out clean. 6. Allow to cool, and then sprinkle the salt flakes if using. 7. Best eaten at whatever temperature, really. If you want to store it, make sure it's in an airtight container so it doesn't dry out (or wrap it in clingfilm). 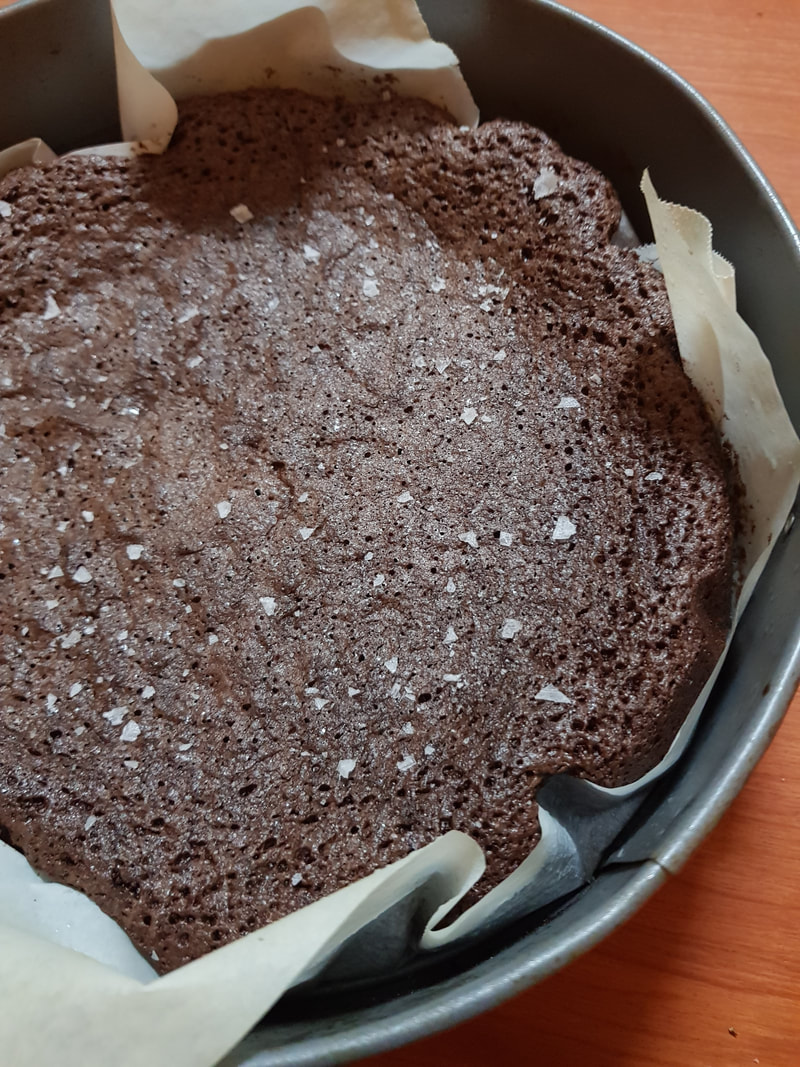  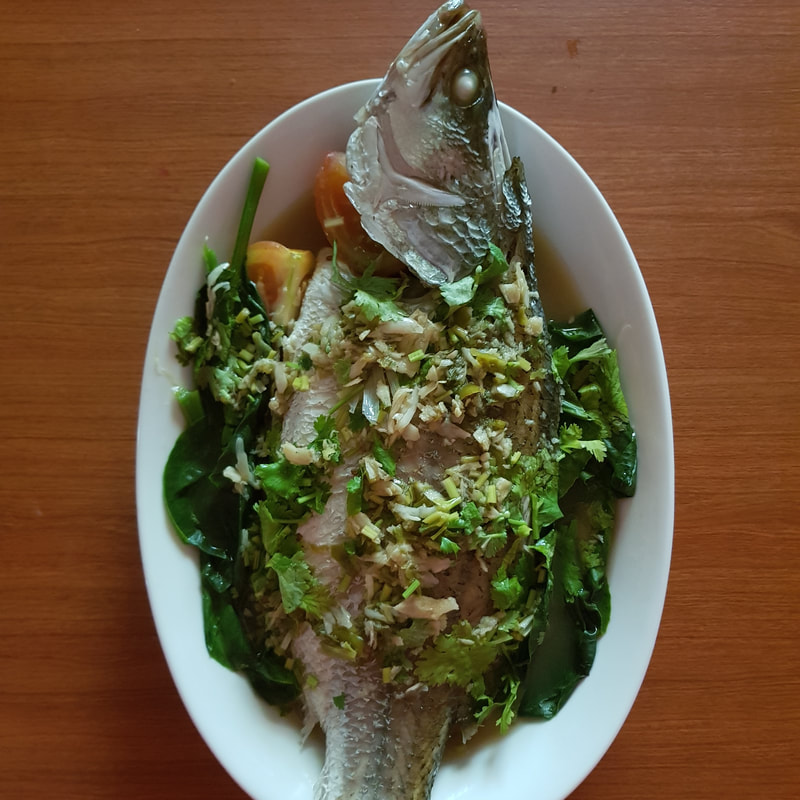 If you live in Malaysia or Thailand then it's pretty common to see this dish pretty much in every Thai or Malaysian-Thai hybrid eateries - I mean, it is the mother of all steamed fish recipes. It's spicy and acidic in the best way possible, and you'll keep eating it even as your stomach develops an ulcer and that your tummy feels a weird kind of warm afterwards.
Although there are so many restaurants that do this well, sometimes when I am in hermit-mode, I like to make this at home and eat it at my leisure without the need to put on pants. The key to this recipe's success is that the fish has to be FRESH. SUPER FRESH. Otherwise, don't do it. What You Need: 1 medium-sized, FRESH AF seabass, scaled, gutted and cleaned (dude just get the fishmonger to do it) 1 handful leafy Asian greens 1 tomato, quartered 4 cloves of garlic, peeled 5 bird's eye chili 1 inch ginger 3 large limes, juiced Equal amount of fish sauce to the lime juice 1 tsp sugar 1 tbsp chicken stock Some chopped coriander What You Do: 1. Get your steamer out. Lay our the vegetables, and place the fish on top of it. Stuff that fish with quartered tomato. Steam that fish for 15-20 mins. 2. In a pestle and mortar, pound the garlic and chilies together until you get a coarse paste. 3. In a small pot, heat the chicken stock, 1 cup water, lime juice, fish sauce, sugar and the garlic-chili paste until everything is mixed and heated through. Check for taste. It should be sharply acidic, with a nice balanced taste of fish sauce, and some heat. Add more of any of the ingredients if necessary. 4. When the fish is thoroughly cooked, remove the plate onto the table. Pour over the sauce onto the fish. 5. Garnish with the copped coriander. 6. Enjoy, but also don't foget the Gaviscon/Tums for later, just in case. 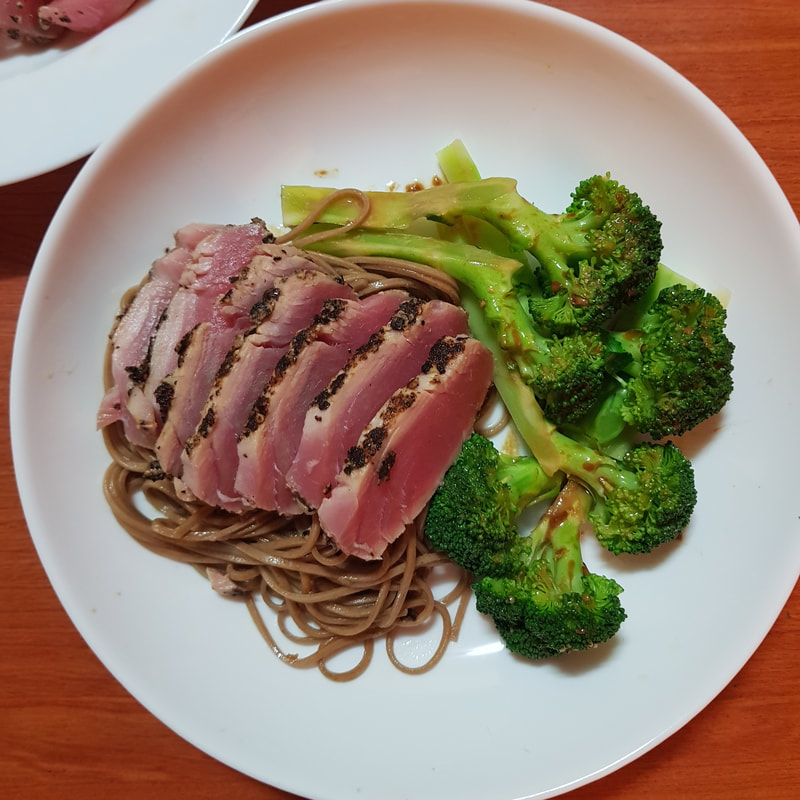 Fish scares the shit out me. For one, I come from a household where fish is usually eaten with rice, and so any other variation is not as familiar to me. Second, they are so damn delicate. Unlike chicken or meat, they break easily in the pan, and if you buy them at the wrong places they tend to smell fishy and downright gross.
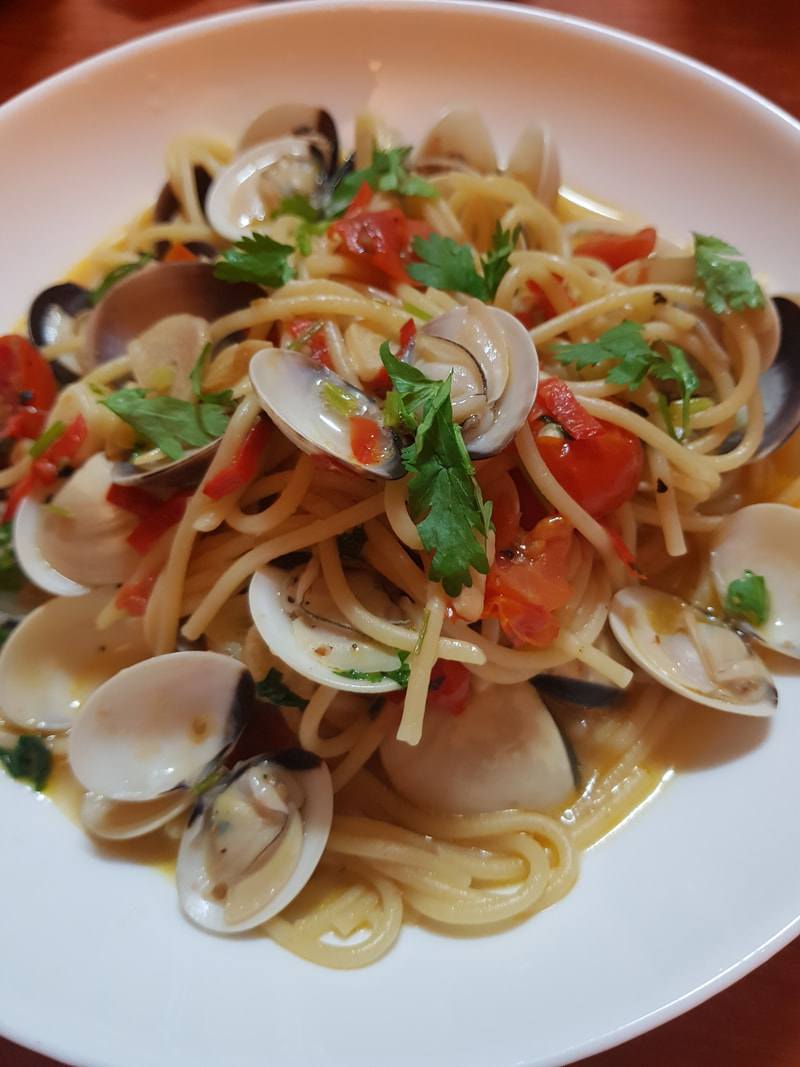
But the thing is, fish is so much better than meat. Just as much protein, but with a lot less fat. Due to these reasons I have taught myself again and again to try and cook fish, and hey! Turns out, it really isn't all that hard or scary. Tuna tataki sounds like some fancy dish that you eat in a Japanese restaurant so fancy that you need to pay everything with a credit card and pay it off in 3 consecutive months, but no. With simple ingredients that you probably already have at home, all you need is a piece of tuna steak, which I get from my neighborhood Cold Storage for RM15. You don't need a credit card for that. This recipe makes a plate for 1. What You Need: For the tuna... 1 piece tuna steak (it doesn't really matter how big) 1 tsp dijon mustard 2 tsp olive oil 2-3 tbsp coarse ground black pepper For the soba noodles and broccoli... 1 handful soba noodles Broccoli, cut into long florets 1-2 tbsp sesame seeds 1 small piece ginger, peeled and grated 2 tbsp light soy sauce Some chili flakes What You Do: 1. First, get some water boiling in a pot on the stove. Wash and slice the broccoli into long florets. 2. Now, the tuna. Scatter the coarsely ground black pepper onto a dry, flat plate. Mix the mustard and oil, and season really well with salt. Brush the sides of the tuna with this until well-coated. 3. Now roll that tuna onto the peppercorns, so that the tuna is now crusted with them. 4. Heat a pan to high, and toast the sesame seeds until golden. Remove the seeds. 5. In the same pan over high heat, sear that tuna steak. This takes a really, really short while. Really. Like 50-60 seconds each side ONLY. Remove the fish onto a cutting board. 6. When the water begins boiling in the pot, add the soba noodles and the broccoli. Remove after 3 minutes, or until soba is cooked through. 7. Mix the ginger, chili flakes and soy sauce. Dress the noodles with it. Add the sesame seeds to the noodles. Spoon some of the dressing over the broccoli. 8. Slice up the tuna steaks really thinly, and serve with the noodles and broccoli. 9. Keep that credit card of yours for some other day. 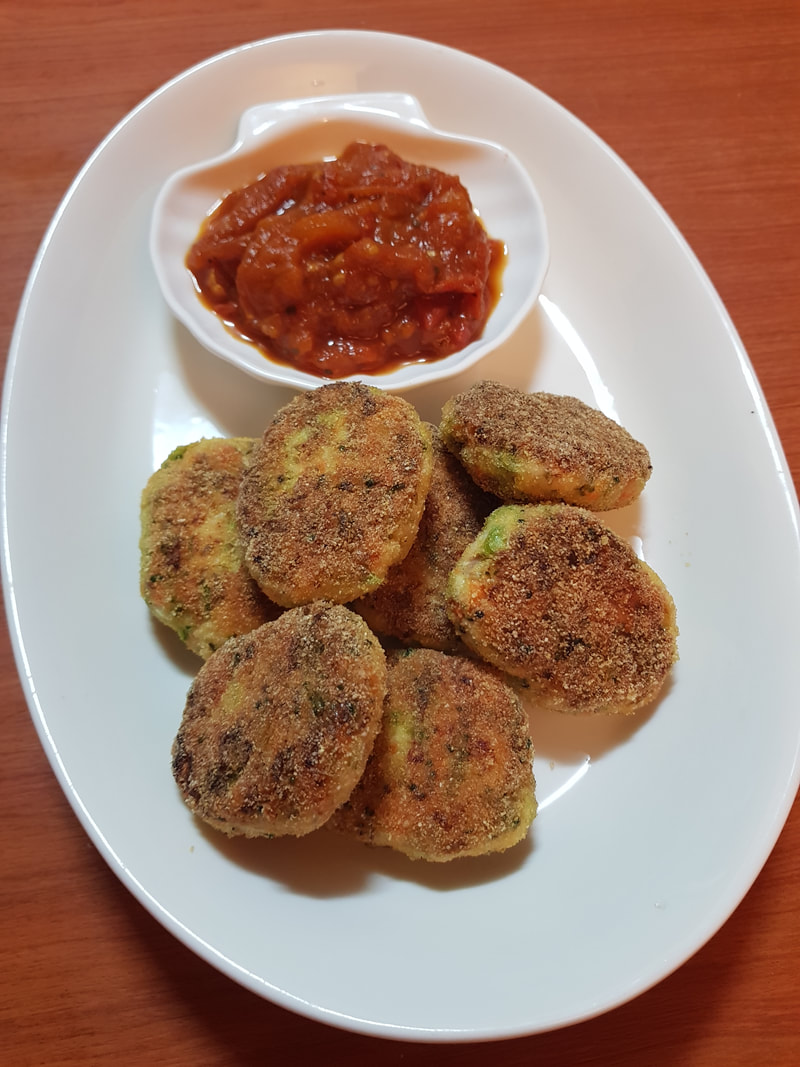 I used to love KFC Chicken Nuggets. They were my favourite things from KFC, even more so than the fried chicken. One day, a healthy friend said to me, "why do you eat those things? They're made from cardboard and rat meat." Upon research, I found this to be untrue. But holy moly, fast food chicken nuggets contain so much crap that they may as well be cardboard and rat meat. I no longer eat those delicious albeit poisonous KFC specialty, which means that sometimes, when they sky is grey and and I'm on my period, I start missing them very badly. These homemade nuggets are natural, healthy and delicious, and they definitely help me move on from KFC. But of course they don't taste exactly like KFC chicken nuggets. There are no chicken skins, chicken bones or slabs of chicken fat in them. This recipe makes enough nuggets for 3 people. What You Need 300 grams chicken breast A few florets of broccoli 1 carrot 1 onion 1 clove garlic 1 egg 3-4 tbsp polenta, plus more for coating Garlic powder (WTF is Polenta? It's grounded dried corn. You can also substitute with breadcrumbs.) What You Do 1. Using a food processor (get a food processor! It saves lives), blitz chicken until they become minced. Transfer to mixing bowl. 2. Blitz together broccoli, carrot, onion, and garlic. Add to mixing bowl. 3. Add egg, polenta, garlic powder, pepper and 1 tsp salt. Mix everything thoroughly. 4. Using wet hands, shape the mixture into nuggets. Refrigerate the ones you want to eat for at least 1 hour. Freeze the rest, for one of those later nights (you know they're coming). 5. When ready to eat, take them out of the fridge. Coat them with more polenta. 6. Shallow fry in some oil, until the outside is golden and crunchy. Remove onto some kitchen towels. 7. Eat with some ketchup, or a yogurt dip. Also, post them on Instagram. If there is no picture, then it's not real. 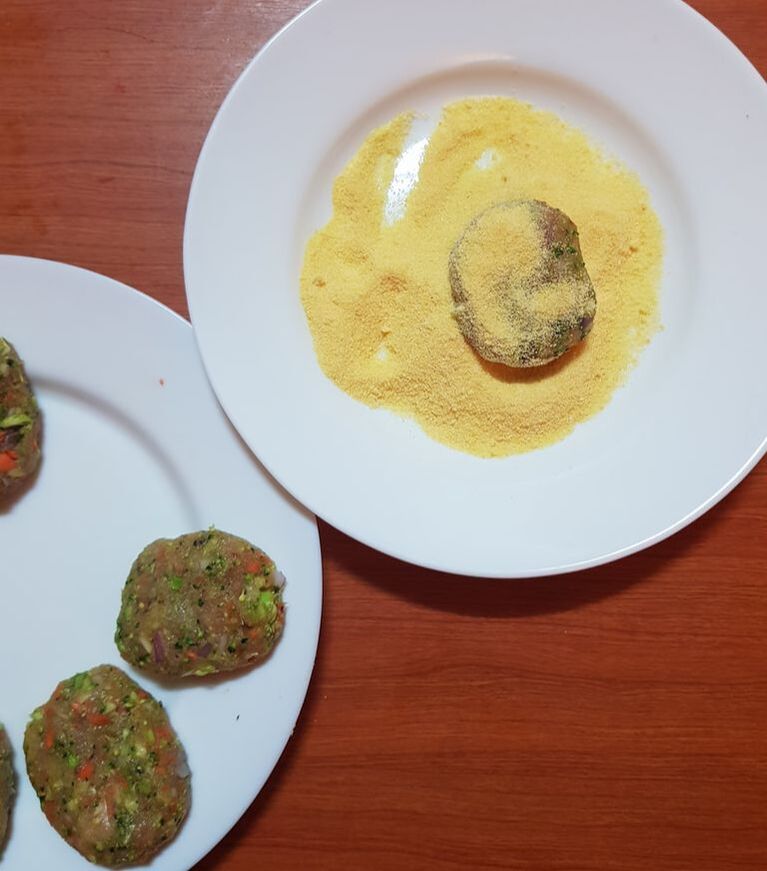 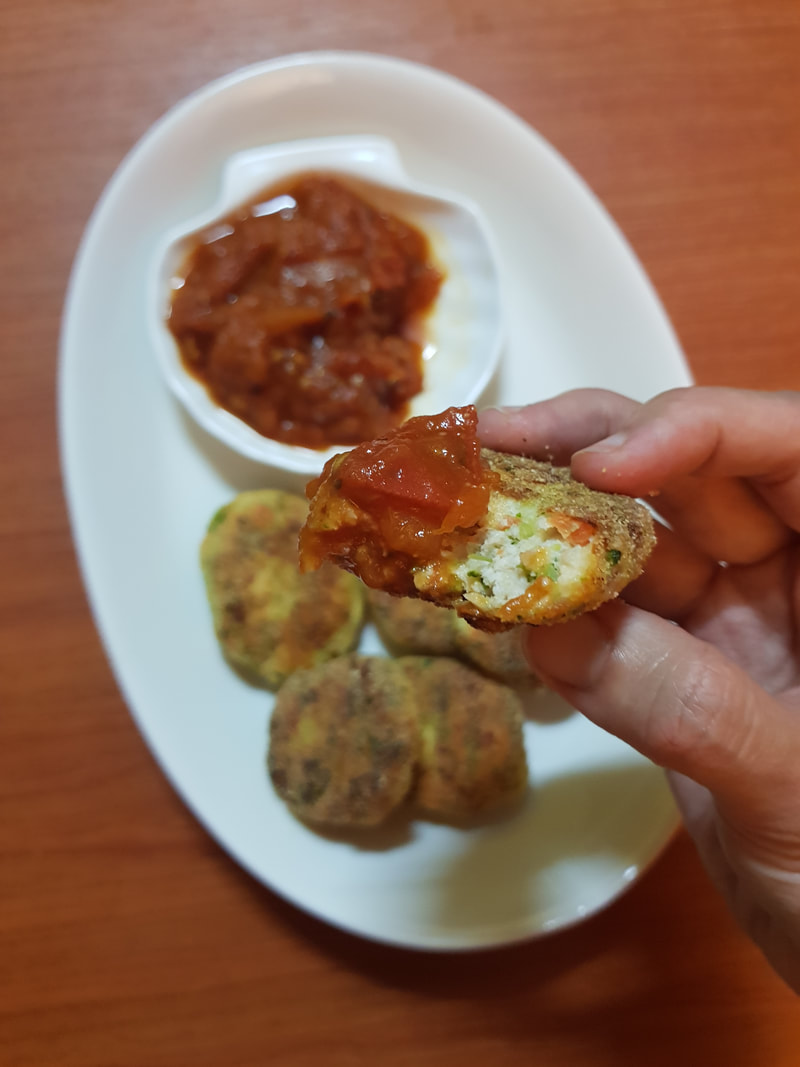 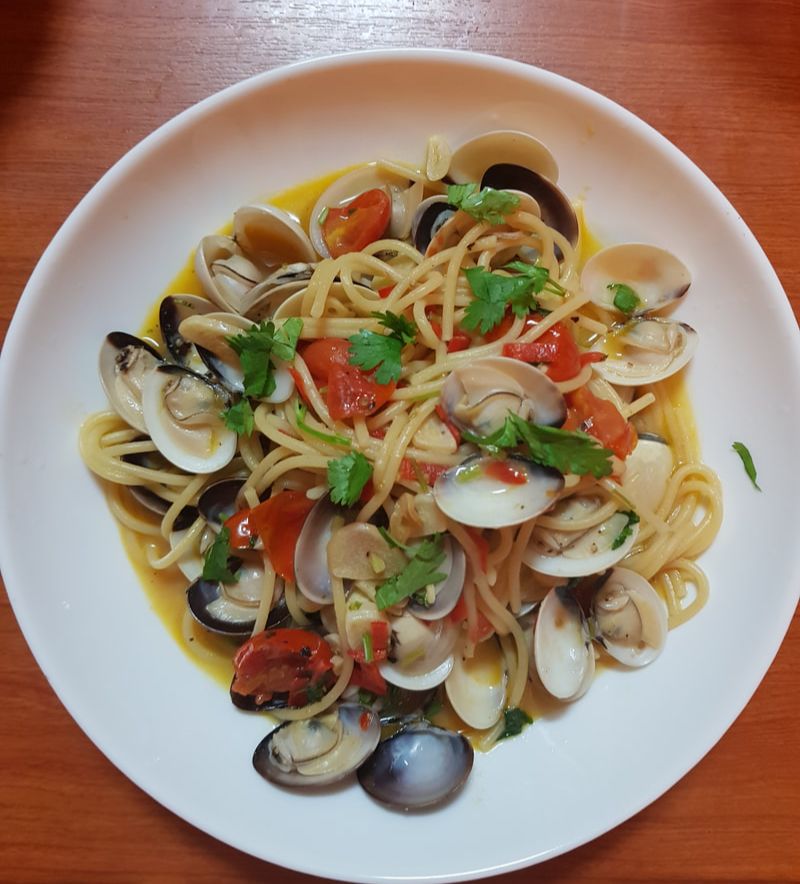 The age-old weeknight dilemma – tired as s***t, but still want some good, hot plate of home-cooked dinner to eat while not wearing pants and watching Netflix. I don’t know about you, but I can attest based on my own experience that being a busy bee in a city can easily lure me into a pit of underwhelming takeouts that are usually unhealthy and frankly, expensive. Case in point, a plate of spaghetti vongole (spaghetti with clams) can go so wrong in so many ways. The restaurant charges you a fortune, the pasta isn’t even that great, and worse, the clams died 5 months ago with that smelly fishy smell. The truth is, spaghetti vongole is so, so, so easy to make. And this comes from a girl who would never attempt to cook anything that takes more than 5 steps. It takes literally 15 mins, and it costs a fraction from eating out, so you can finally save up for that well-deserved nose job. You need a few ingredients, and although the original recipe asks for some wine/broth for the sauce, I find that using some pasta water is definitely sufficient. On your way back from office, stop by the grocer’s and pick up some clams (preferably alive) and a couple more basic ingredients that you probably already have anyway, and you’re good to go. This recipe makes 2 plates of pasta. What You Need Dried pasta (amount is dependent on how hungry you are, tbh) 100-200 gms small clams 2 tbsp. extra virgin olive oil 4 cloves garlic, peeled and sliced 1 large red chili, de-seeded and chopped 1 bunch of coriander, stalks chopped 1 handful of cherry tomatoes, halved ½ lemon What You Do
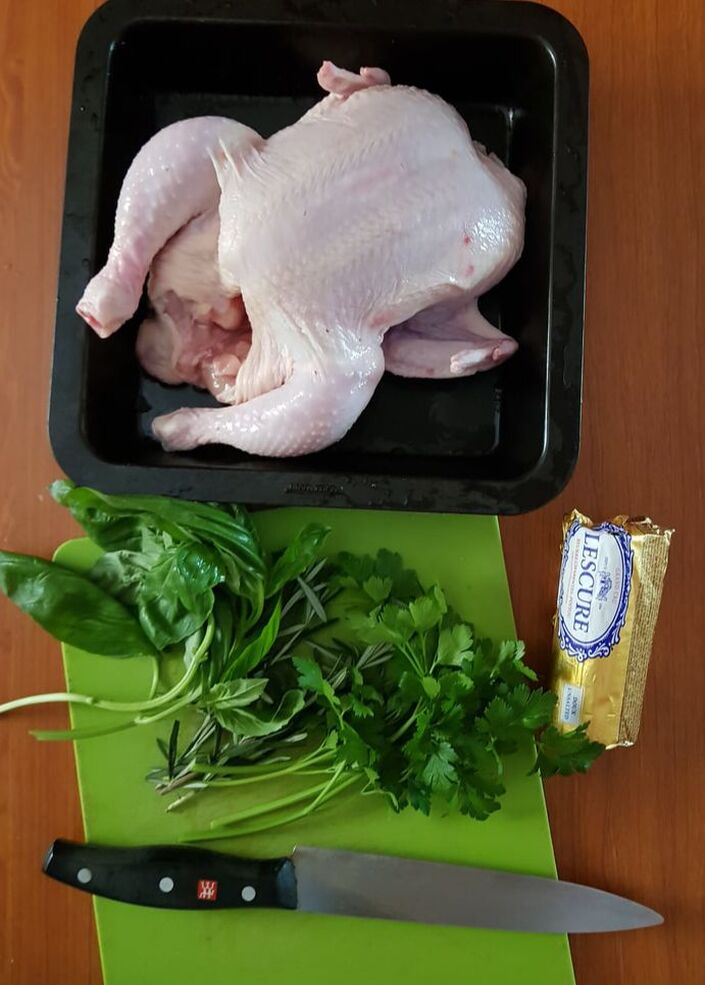
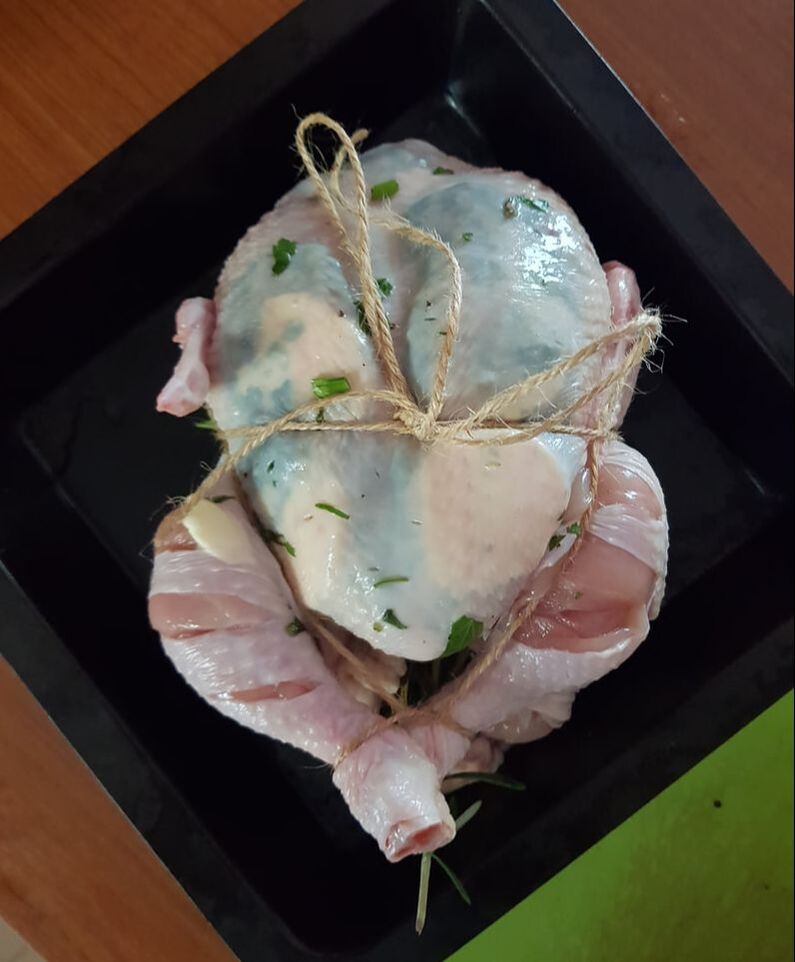
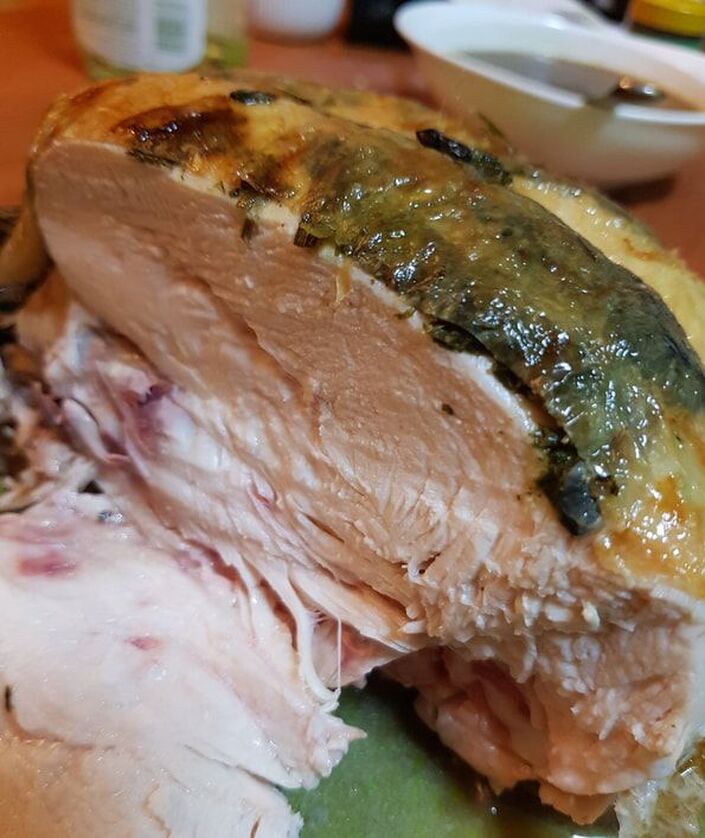
 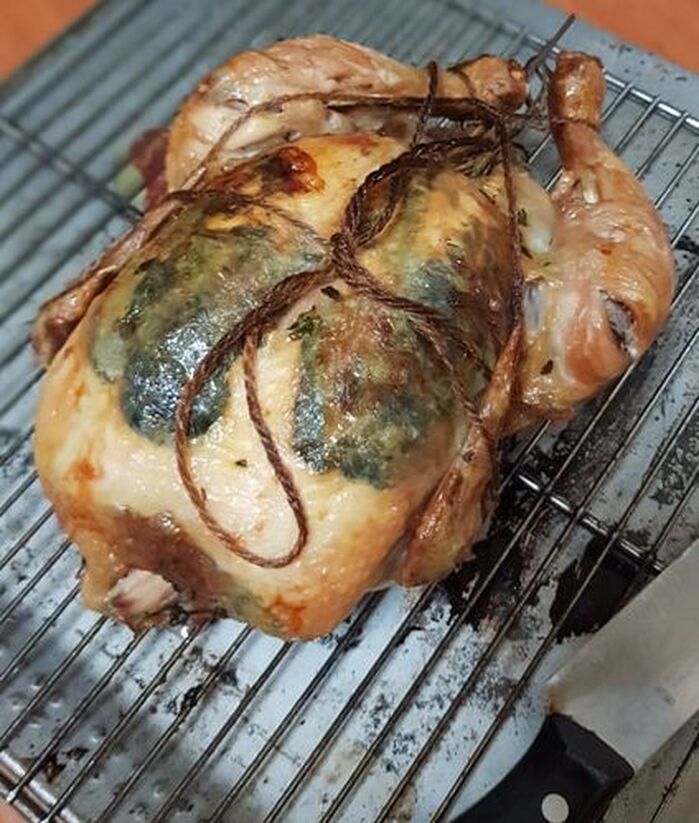 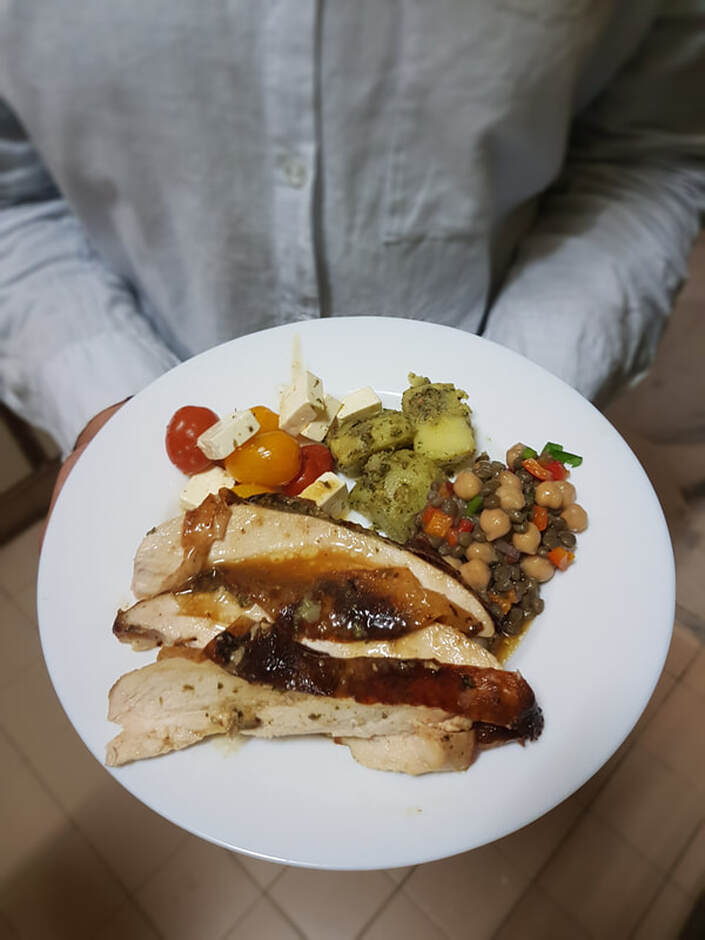 Last year, one of my bigger goals for 2018 was to learn how to properly roast a whole chicken. A roast chicken is one of those things that sounds simple enough, but when you do make it you’ll realize it’s hard to achieve the criteria that makes a roasted bird perfect – crispy skin, thighs that are cooked through, juicy breasts, and of course, full on flavor. I hate bland roast chicken (I hate bland food full stop). I wanted to have roast chicken in my amateur cooking repertoire, and after a few trials, recipes and errors, I think I nailed it, guys. This one is slathered in herbs and lemony, juicy with crispy skin. You can use the leftovers in your aglio olio pasta, make a chicken sandwich, boil the bones to make stock, or top your salad. But to be honest, it’s hard to have leftovers for this one. This recipe makes one whole bird. What You Need 1 whole medium-sized chicken, cleaned 1 whole lemon 1 bunch fresh herbs – a mix of rosemary, thyme, dill, basil, whatever 2 tbsp unsalted butter 3 tbsp extra virgin olive oil 3 large onions 1 clove garlic Some rope to tie the chicken What You Do
    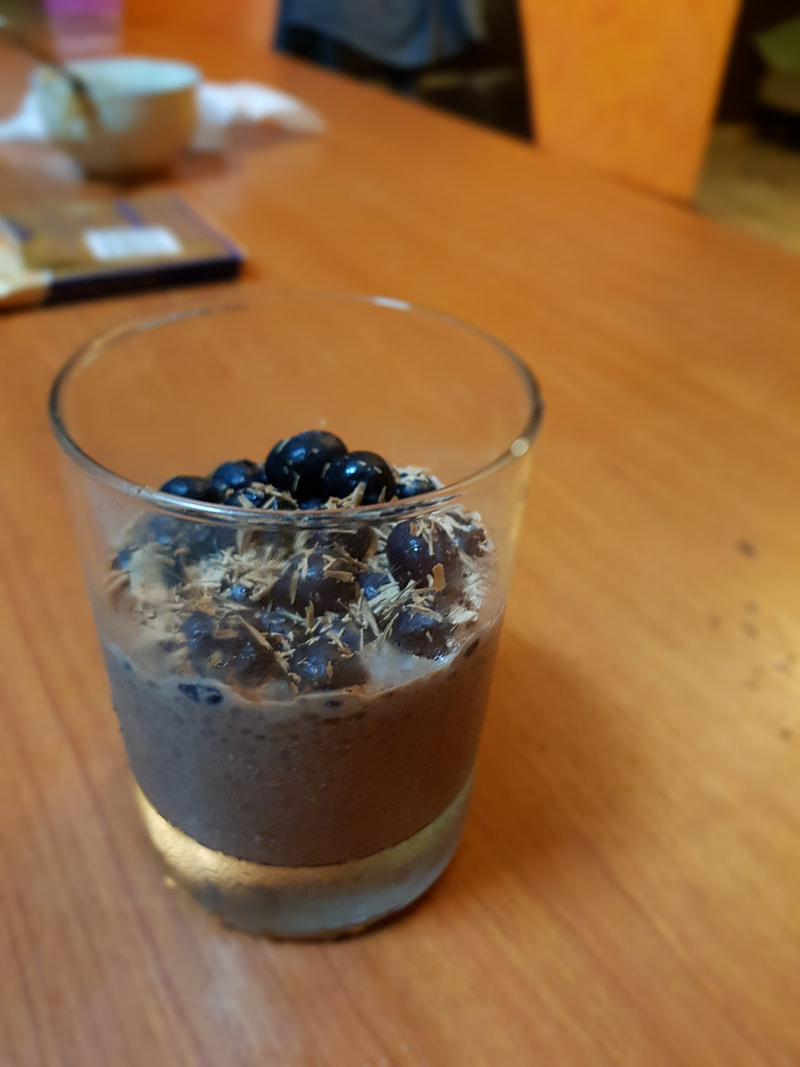 My yoga classes are usually at night, after work. And by the time I get home, it's usually already 9.30 pm, and although I stay away from food at least 2-3 hours before bed time, sometimes hunger just screams, especially after a gruelling work out drill. At this point it becomes really easy to start on the junk. So enter this magical wonder - the chocolate chia seed pudding.
What the hell are chia seeds anyway? The first time I tried it I gagged because it tasted like frog eggs/spawn (ok I've never eaten frog spawn, but chia seed certainly looks like them). Chia seeds are actually edible seeds that are rich in omega-3 fatty acids (like the one in salmon!), fiber, iron and calcium. Now, don't they sound better than that caramel pudding you're about to pound on? After a few tries/errors, I now present to you a chia seed dessert that is so delicious and will NOT remind you of amphibian eggs. And if you're feeling vegan, substitute the milk with coconut milk. This recipe makes one portion of pudding. What You Need: 3-4 tbsp chia seeds fresh milk, 4x the amount of chia seeds you're using 1 tsp of date syrup 1 tbsp 100% cocoa powder Fruits of your choice (I recommend blueberries, strawberries or bananas) What You Do: 1. Combine everything except for the fruits in a bowl. Use a whisk to make sure everything is incorporated. 2. Relocate into a glass, cover with clingfilm. 3. It needs to sit for at least 4 hours. You know it's ready when it's firm but not dry (if it does seem dry, add a splash of milk/water) 4. Top with fruits, and some dark chocolate shavings. 5. Best enjoyed when it's cold, and you've just finished a yoga class. 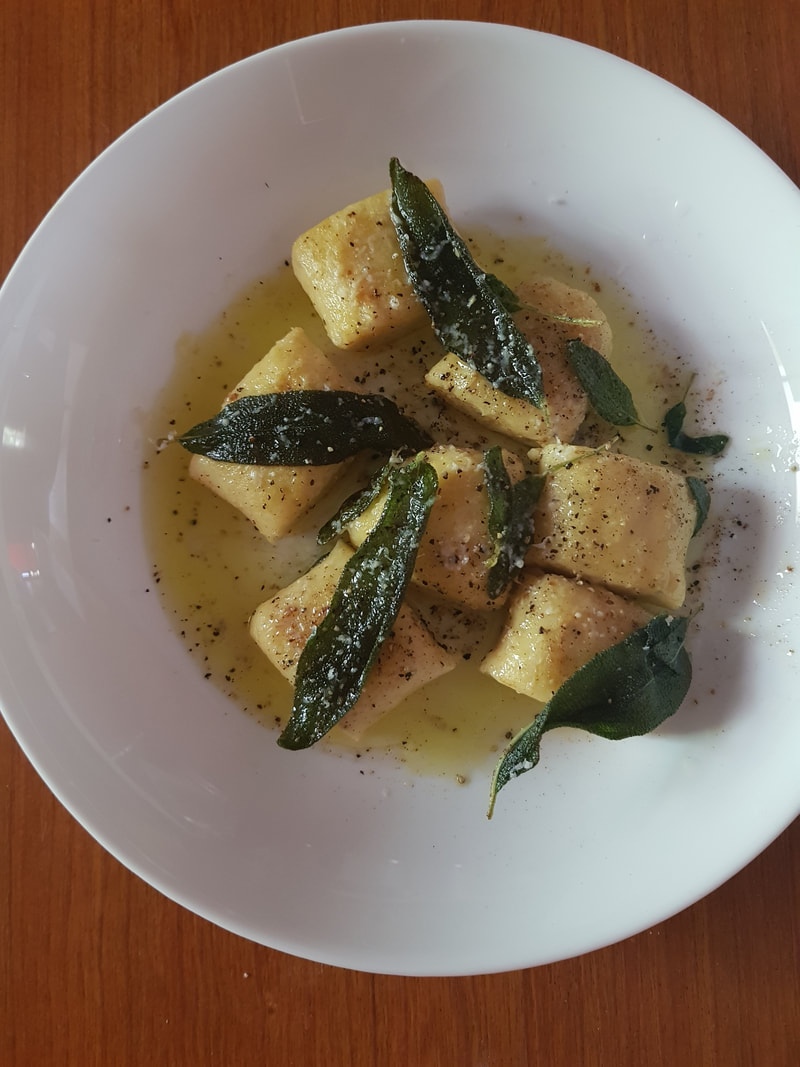 Here’s the most common misconceptions about Italian food; that they’re expensive to make and only people who have won the Masterchef can make them. In fact, it is actually quite the opposite. Most Italian food are made using simple ingredients, and the recipes are pretty basic and easy to follow (my biggest pet peeve is going to restaurants in Malaysia and getting charged the equivalent of 3 gold nuggets for a plate of basic pasta). Now, enter the gnocchi, which is basically just humble potato dumplings. They are soft pillows of dumplings in a simple sauce (sometimes butter/oil based, sometimes tomato-based), and they make for a great simple weekend lunch while you chill with a tall glass of cold drink and enjoy the balmy weather. This one is is coated in a simple, herby lemony butter sauce, and made more perfect with a combination of some crispy fried sage leaves. This recipe makes 2 pasta servings. What You Need: 1 large Russet potato, peeled 1 1/2 cups of fine flour 1 egg 1/2 lemon 1 bunch fresh sage leaves Butter Extra virgin olive oil What You Do: 1. Cut the potato into small pieces and boil until soft. Drain. Mash the potato. 2. Prep a working surface. Make sure it’s dry, and dust it with a good amount of flour. 3. Pile the mashed potato on it. Make a well in the middle. 4. Crack an egg. Whisk it slightly, pour it in that well. Add 1/5 tsp salt. 5. Now remember the flour? The trick is to add the flour bit by bit into the mixture, until you get the consistency you want. 6. Slowly work the dough into the egg well, and as you mix them, add more flour. We’re not trying to make bread here, so there’s no fancy technique, just use your hands and make a dough that doesn’t fall apart (add more flour if it does). Relax. 7. Roll them into long sections about 1.5 inch diameter, and then cut them into 1/2 inch pieces. They don’t have to look symmetrical. Again, relax. 8. Now the sauce - in a pan, put 2 tbsp butter, 2 tbsp olive oil, lemon zest, and salt. Turn a very low heat on, let everything melt and infuse. 9. When the oil starts bubbling, put in the sage leaves (make sure they are dry! Otherwise the oil will spatter). You want them to crisp up. 10. Meanwhile, boil some salted water and add the gnocchi to cook. This will take 2-3 minutes only. The dumplings are ready when they float. 11. Add the gnocchi straight into the butter sauce pan. Some people prefer to let the dumplings brown a little on the outside. 12. Remove to a plate, place the sage leaves on top, drizzle some lemon juice, add some freshly cracked black pepper, grate some parmesan if you’d like (optional). 13. There you go. You’re not Italian, but close enough. Note: the gnocchi is great frozen to. Just make sure each piece doesn't touch each other, and keep them in a lined container. Keeps in the freezer for up to a month. 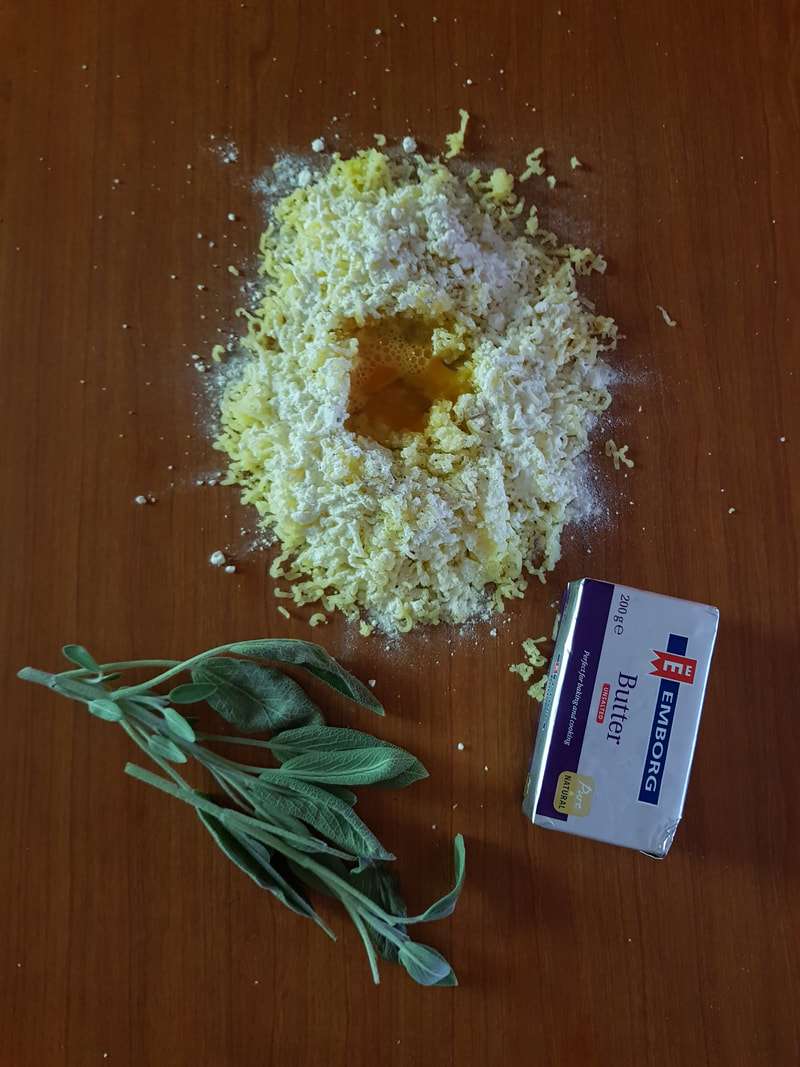 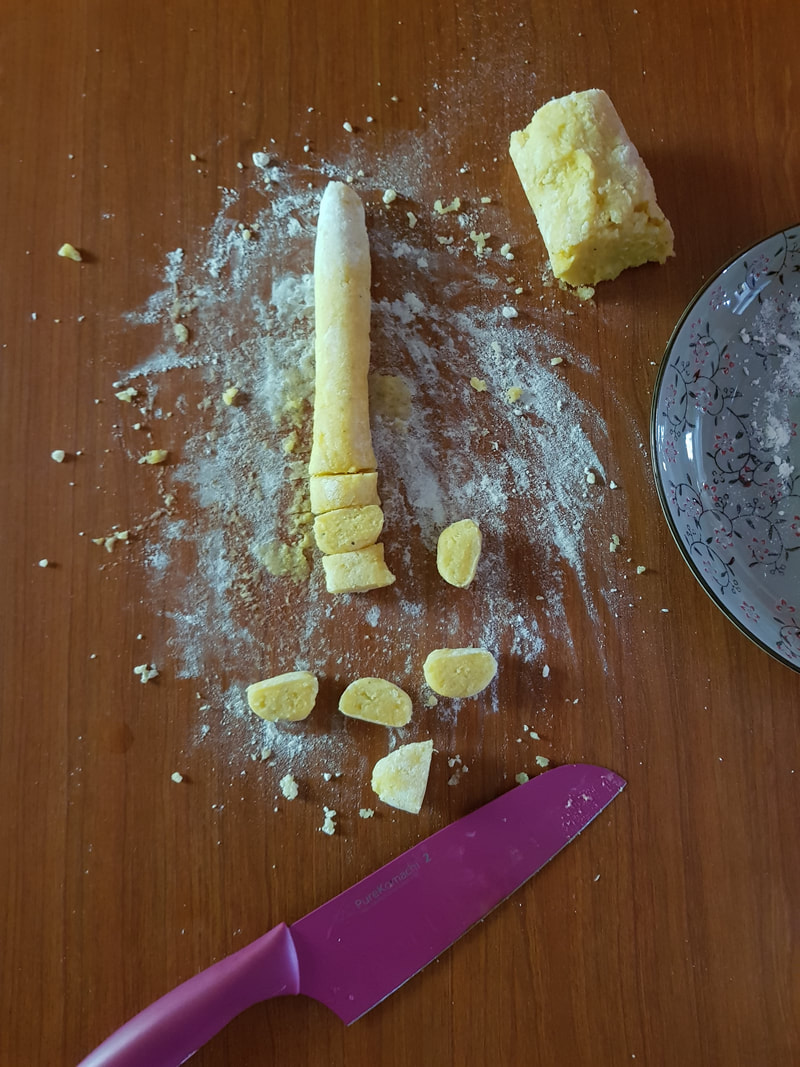 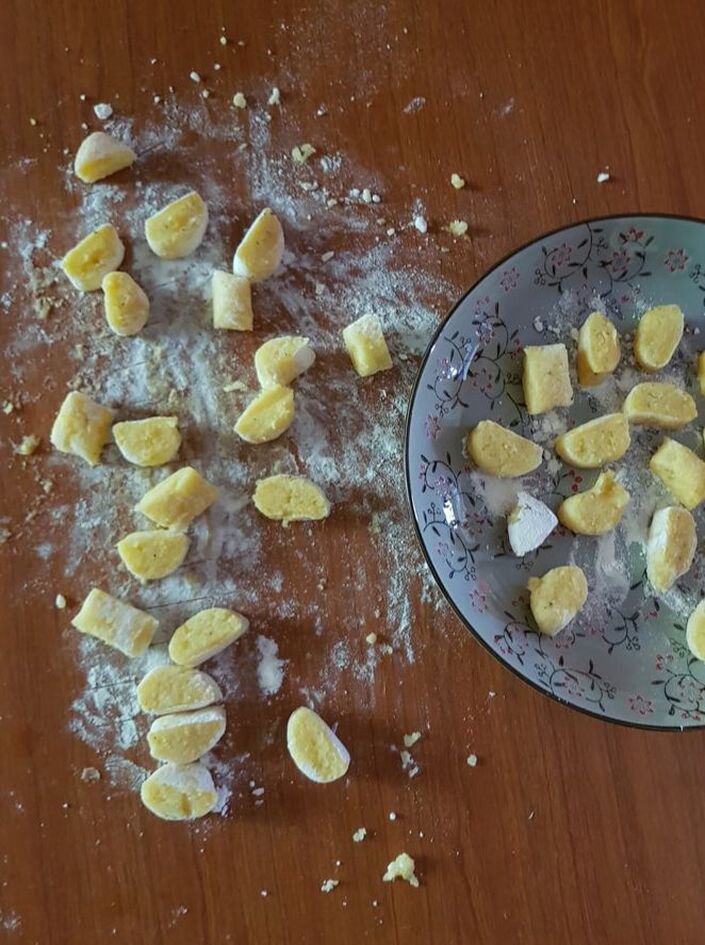 |
